This guide will explain what the Web Disk interface is and how you can manage and create your Web Disks through the control panel.
What is Web Disk?
Web Disk (also known as WebDAV) is a control panel interface that allows you to manage your server files across multiple devices.
How to get to the Web Disk Interface
Navigate to the Control Panel and search for ‘Web Disk’. Select the link as shown below

Main Web Disk Account
The system creates an account for you by default and you can not delete this account. It will have the same login information as your Control Panel account. To access its files click ‘Access Web Disk’. For some operating systems you may have to click ‘Enable Digest Authentication’.
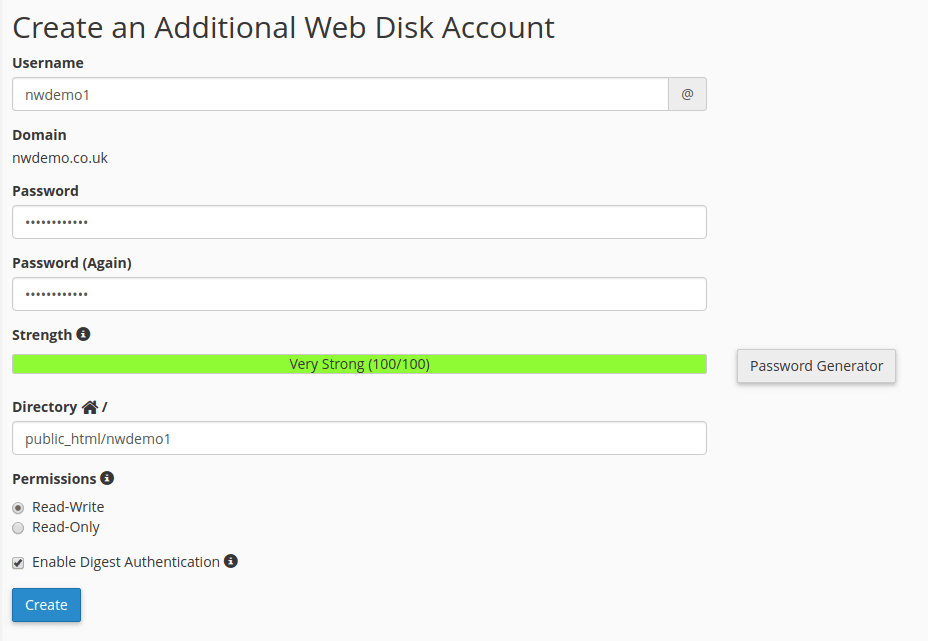
Create an Additional Web Disk Account
You may wish to create an additional account. To do this you must:
- Enter your new account’s username.
- Select a domain. If you have only one domain this will be selected by default.
- Enter a password. The ‘Strength’ bar below indicates the strength of the password. You can generate a strong password using the ‘Password Generator’ to the right hand side of the fields.
- Enter your desired directory.
- Select a permission setting. Either ‘Read-Write’ granting access to operations in the directory or ‘Read-Only’ granting access to read, download or list files in the directory.
- If you are a Windows user, we recommend that you select ‘Enable Digest Authentication’
- Once satisfied, click ‘Create’.

How to Access Additional Web Disk Files
Navigate to the ‘Manage Additional Web Disk Accounts’ table at the bottom of the page. Find your account’s username and click the link under ‘Directory’ to access the files.
To delete the account, under the ‘Actions’ heading click ‘Delete’
You can also change your accounts password under the ‘Actions’ heading by clicking ‘Change Password’ and typing your new password in the required fields.

